


VPN
اول شيئ قبل دخولنا في صلب الموضوع راح اقول ليك ماهية vpn
اخواني ال vpn هي اختصار ل Virtual Private Network وتعني بالعربية الشبكة الخاصة الظاهرية
وهي عبارة عن توصيل جهازين او شبكتين معا عن طريق شبكة الانترنت
وهي
تقنية تعتمد في عملها على بروتوكول حيث يطلق عادة على عملية انشاء اتصال
خاص بين جهازي كمبيوتر من خلال شبكة وسيطة كالانترنت .اسم نقل البيانات
عبر مسار امن (Tunneling )
حيث يتم انشاء هذا المسار بين جهازي الكمبيوتر مباشرة.
شرح بش يكون عل 3 أنظمة الأكثر إستعمال فيستا وسافين و-xp
خاطر تختلف بناتهم وهذي أكثر مشكلة يحصلوا فيها
اولا سجل في الموقع يعطيك اتصال مدى الحيات http://adf.ly/DpmJs
بعد ذلك سيضهر لك مربع خانه الهوست اكتب بها
trial.vpnpop.com
بعد ذالك اضغط انهاء
بعد ذلك سجل الدخول بالايميل و الباسوورد
بعد ذلك ستاخذ اي بي هدا الاي بي رح يكون لاي بي الي رح يتسجل في الهوست
ومبرووووووووك ,,, طبعا التبليغ رح يكون طياره بالتوفيــــــــــــــــيق
للجميع
شرح Video كيفية عمل اتصال VPN على ويندوز XP
شرح بالصور كيفية عمل اتصال VPN على ويندوز فيستا
الشرح :
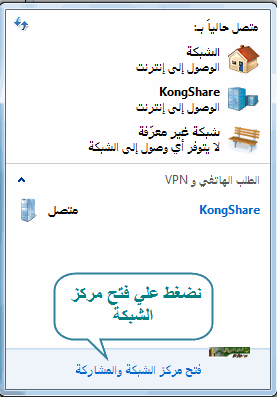
اول شيء نروح الى قائمة ابداء Control Panels
نختار Network and Internet
اضغط عليها كما هوا موضح Network and Internet .

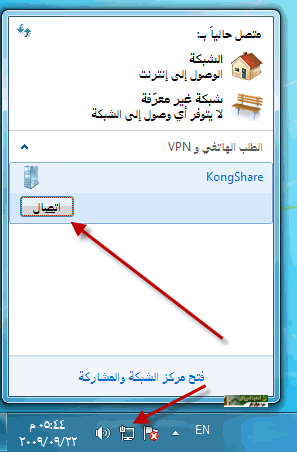
بعد ذلك نضغط على Connect to a network كما موضح بالصورة

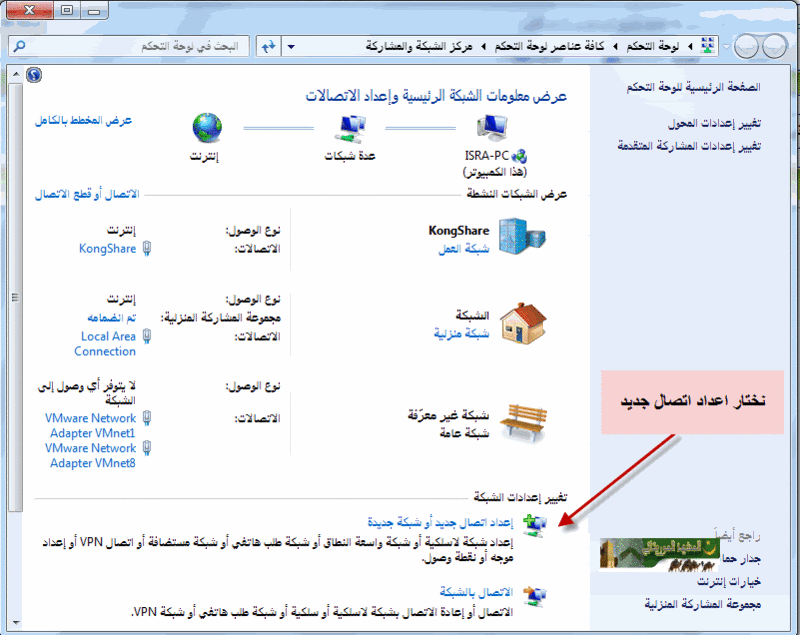
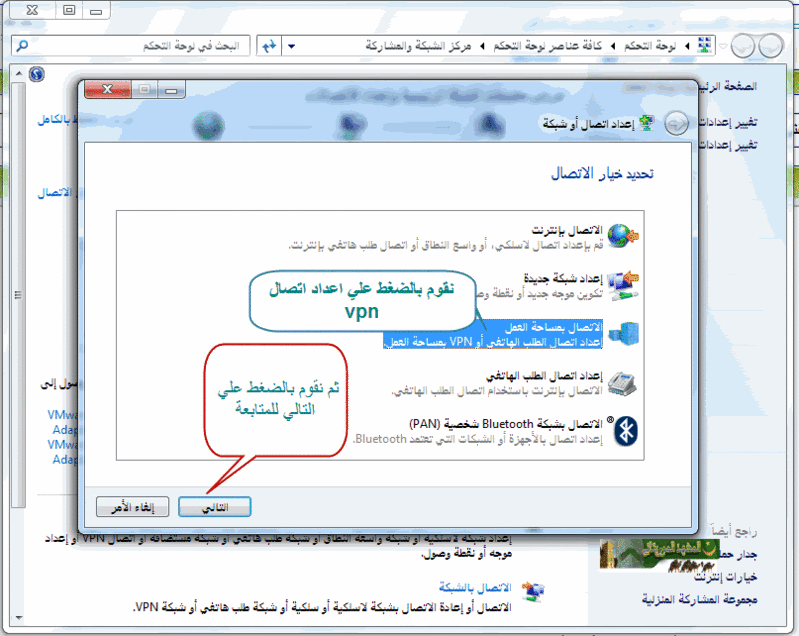
نجي الحين نسوي انشاء اتصال VPN

Choose the Connection Type
On the next screen, click on “Connect to a workplace” then click “Next.”

نختار
Internet connection
بعد ذلك اضغط على Use my Internet connection

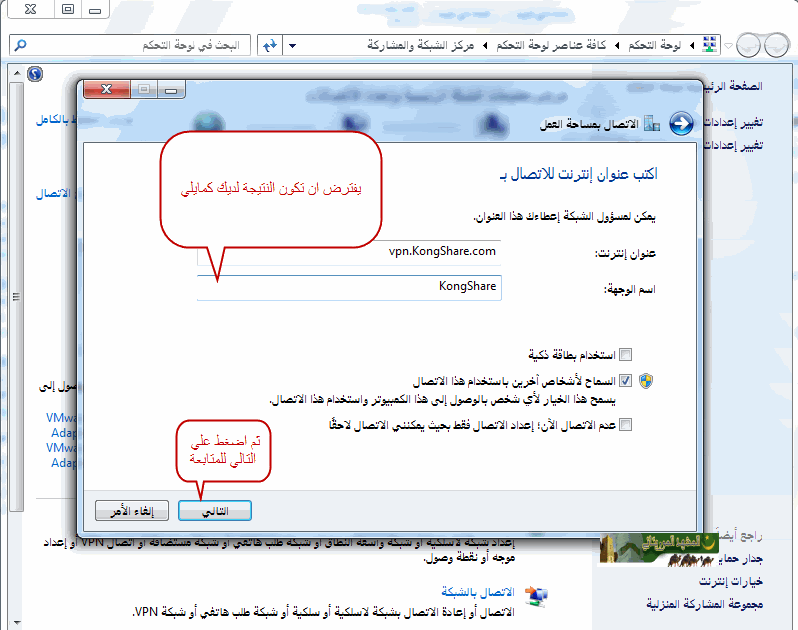
بعد ذلك ضيف معلومات السيرفر الاتصال

بعد ذلك نضيف معلومات الاتصال
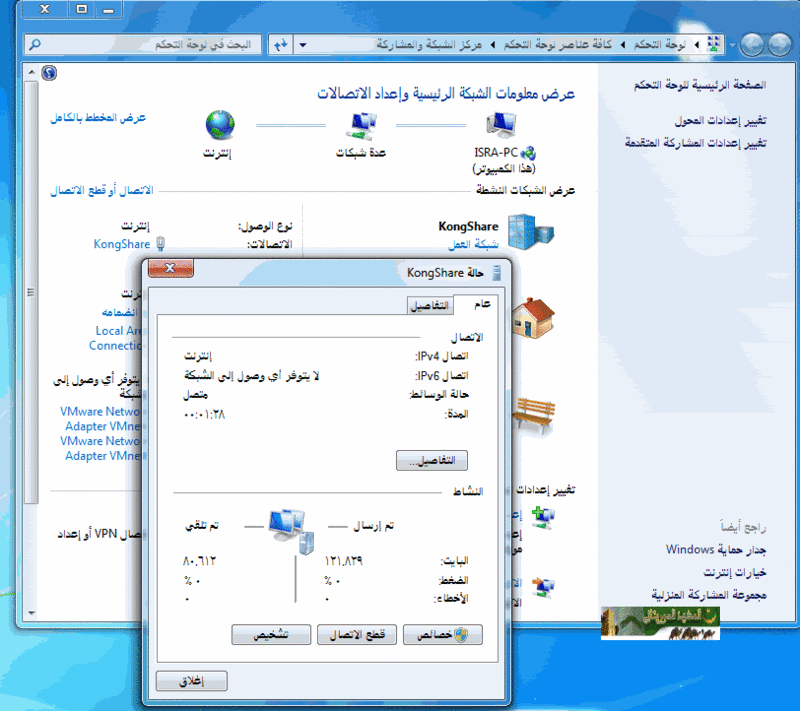
 الحين نجرب نسوي اغلاق للعمل

نروح الحين الى اتصالات الشبكة

نضبط الحين خصائص الشبكة والاتصال
In the
“Connect to a network” screen, you should see the PublicVPN.com
connection that we set just up. Right–click on the PublicVPN.com
connection ******** (circled in red), and choose “Properties” (circled
in green) from the menu.

Select Options
In the property window, click the “Options” tab.

Deselect domain logon
In the “Options” tab, make sure the checkbox labelled “Include Windows logon domain” (hilighted in green) is unchecked.
Then click the “PPP Settings…” button (hilighted in red).

PPP options
In the
“PPP Settings” dialog box, make sure the settings look like the ones
in the picture below, then click the “OK” button (hilighted in red).

Go to the Security tab
Next, click the “Security” tab, which is hilighted in red.

Security tab settings
Make sure the security tab has the same settings as here. Then click the “Networking” tab, hilighted in red below.

Neworking settings
This
screen shows you the network settings. You may have different items in
your list. In the list of items that you see, make sure that only the
“Internet Protocol Version 4(TCP/IPv4)” and “Client for Microsoft
Networks” items are checked. If oher protcols are checked, uncheck them
by clicking on the checkbox (the thing that looks like a ‘√’).
PublicVPN.com currently does not route anything except TCP/IP version 4.

Set TCP/IP v4 Properties
Now,
click on the “Internet Protocol Version 4 (TCP/IPv4)” item in the list
(hilighted in green) and click the “Properties” button (hilighted in
red).

Set VPN DNS
Next,
set the VPN connection’s DNS server to the PublicVPN.com DNS server.
Click the “Use the following DNS server addresses” radio buton in the
property window (hilighted in green) and type the PublicVPN.com DNS
server address in the “Preferred DNS server” **** area. The
PublicVPN.com DNS server is: 172.31.0.1. Then click the “OK” button.

Done with basic setup!
You’re
now done with your basic setup! You've set up your PublicVPN.com
connection to use PPTP. Click “OK” to finish now, if you want.
However, for better security we recommend that you configure your VPN
connection to use an L2TP/IPsec connection, which is more secure. To do
this, keep reading.
Setting up L2TP/IPsec
In the “PublicVPN.com Properties”, click on the “Type of VPN” pop–up menu (hilighted in red) and select “L2TP/IPsec”.

Go to IPsec Settings…
Next, click on the “IPsec Settings…” button (hilighted in red).

Set the Preshared Key
In the
“IPsec Settings” dialog, click the radio button labelled “Use
preshared key for authentication” (hilighted in green). Then type
‘publicvpn.net’ into the ****box labelled “Key” (hilighted in blue).
Then click the “OK” button (hilighted in red).

Finished!
You’re finished! Click the ”OK” button to save your settings.

Set the connection location
The
first time you connect to PublicVPN.com, you might see a screen like
this one. Windows is asking you if you want to automatically connect to
PublicVPN.com whenever you’re at a given location. If you want to
connect to PublicVPN.com automatically when you’re at a public hotspot,
click “Public location.”
However, you probably should click ”Cancel”, because most public
locations require you to click through an agreement before you can
access the Internet — meaning that any connection you attempt will fail.
Instead, you should just connect manually.

Connecting to PublicVPN.com
To connect to PublicVPN.com, go to the Start buton and click “Connect To”.
 Then click on the PublicVPN.com entry and click “Connect”.

انتهى الشرح وواضح بالصورة
الشرح علي نظام الويندوز 7 وهم مطابق للفيزتا
فقط اتبع كما هو في الصور :


انتهى الشرح
Kill4Life
[منقول]
التقييم ان امكن
[/size][/b]
[/size]
اول شيئ قبل دخولنا في صلب الموضوع راح اقول ليك ماهية vpn
اخواني ال vpn هي اختصار ل Virtual Private Network وتعني بالعربية الشبكة الخاصة الظاهرية
وهي عبارة عن توصيل جهازين او شبكتين معا عن طريق شبكة الانترنت
وهي
تقنية تعتمد في عملها على بروتوكول حيث يطلق عادة على عملية انشاء اتصال
خاص بين جهازي كمبيوتر من خلال شبكة وسيطة كالانترنت .اسم نقل البيانات
عبر مسار امن (Tunneling )
حيث يتم انشاء هذا المسار بين جهازي الكمبيوتر مباشرة.
شرح بش يكون عل 3 أنظمة الأكثر إستعمال فيستا وسافين و-xp
خاطر تختلف بناتهم وهذي أكثر مشكلة يحصلوا فيها
اولا سجل في الموقع يعطيك اتصال مدى الحيات http://adf.ly/DpmJs
بعد ذلك سيضهر لك مربع خانه الهوست اكتب بها
trial.vpnpop.com
بعد ذالك اضغط انهاء
بعد ذلك سجل الدخول بالايميل و الباسوورد
بعد ذلك ستاخذ اي بي هدا الاي بي رح يكون لاي بي الي رح يتسجل في الهوست
ومبرووووووووك ,,, طبعا التبليغ رح يكون طياره بالتوفيــــــــــــــــيق
للجميع
شرح Video كيفية عمل اتصال VPN على ويندوز XP
شرح بالصور كيفية عمل اتصال VPN على ويندوز فيستا
الشرح :
اول شيء نروح الى قائمة ابداء Control Panels
نختار Network and Internet
اضغط عليها كما هوا موضح Network and Internet .
بعد ذلك نضغط على Connect to a network كما موضح بالصورة
نجي الحين نسوي انشاء اتصال VPN
Choose the Connection Type
On the next screen, click on “Connect to a workplace” then click “Next.”
نختار
Internet connection
بعد ذلك اضغط على Use my Internet connection
بعد ذلك ضيف معلومات السيرفر الاتصال
بعد ذلك نضيف معلومات الاتصال
الحين نجرب نسوي اغلاق للعمل نروح الحين الى اتصالات الشبكة
نضبط الحين خصائص الشبكة والاتصال
In the
“Connect to a network” screen, you should see the PublicVPN.com
connection that we set just up. Right–click on the PublicVPN.com
connection ******** (circled in red), and choose “Properties” (circled
in green) from the menu.
Select Options
In the property window, click the “Options” tab.
Deselect domain logon
In the “Options” tab, make sure the checkbox labelled “Include Windows logon domain” (hilighted in green) is unchecked.
Then click the “PPP Settings…” button (hilighted in red).
PPP options
In the
“PPP Settings” dialog box, make sure the settings look like the ones
in the picture below, then click the “OK” button (hilighted in red).
Go to the Security tab
Next, click the “Security” tab, which is hilighted in red.
Security tab settings
Make sure the security tab has the same settings as here. Then click the “Networking” tab, hilighted in red below.
Neworking settings
This
screen shows you the network settings. You may have different items in
your list. In the list of items that you see, make sure that only the
“Internet Protocol Version 4(TCP/IPv4)” and “Client for Microsoft
Networks” items are checked. If oher protcols are checked, uncheck them
by clicking on the checkbox (the thing that looks like a ‘√’).
PublicVPN.com currently does not route anything except TCP/IP version 4.
Set TCP/IP v4 Properties
Now,
click on the “Internet Protocol Version 4 (TCP/IPv4)” item in the list
(hilighted in green) and click the “Properties” button (hilighted in
red).
Set VPN DNS
Next,
set the VPN connection’s DNS server to the PublicVPN.com DNS server.
Click the “Use the following DNS server addresses” radio buton in the
property window (hilighted in green) and type the PublicVPN.com DNS
server address in the “Preferred DNS server” **** area. The
PublicVPN.com DNS server is: 172.31.0.1. Then click the “OK” button.
Done with basic setup!
You’re
now done with your basic setup! You've set up your PublicVPN.com
connection to use PPTP. Click “OK” to finish now, if you want.
However, for better security we recommend that you configure your VPN
connection to use an L2TP/IPsec connection, which is more secure. To do
this, keep reading.
Setting up L2TP/IPsec
In the “PublicVPN.com Properties”, click on the “Type of VPN” pop–up menu (hilighted in red) and select “L2TP/IPsec”.
Go to IPsec Settings…
Next, click on the “IPsec Settings…” button (hilighted in red).
Set the Preshared Key
In the
“IPsec Settings” dialog, click the radio button labelled “Use
preshared key for authentication” (hilighted in green). Then type
‘publicvpn.net’ into the ****box labelled “Key” (hilighted in blue).
Then click the “OK” button (hilighted in red).
Finished!
You’re finished! Click the ”OK” button to save your settings.
Set the connection location
The
first time you connect to PublicVPN.com, you might see a screen like
this one. Windows is asking you if you want to automatically connect to
PublicVPN.com whenever you’re at a given location. If you want to
connect to PublicVPN.com automatically when you’re at a public hotspot,
click “Public location.”
However, you probably should click ”Cancel”, because most public
locations require you to click through an agreement before you can
access the Internet — meaning that any connection you attempt will fail.
Instead, you should just connect manually.
Connecting to PublicVPN.com
To connect to PublicVPN.com, go to the Start buton and click “Connect To”.
Then click on the PublicVPN.com entry and click “Connect”.انتهى الشرح وواضح بالصورة
الشرح علي نظام الويندوز 7 وهم مطابق للفيزتا
فقط اتبع كما هو في الصور :


انتهى الشرح
Kill4Life
[منقول]
التقييم ان امكن
[/size][/b]
[/size]

